Cleaning Up My Network Shame

There is an old adage about the cobbler’s shoes; and for those of us that actually used to be cobblers, it really rings true. I spend a lot of time helping people optimize their networks, but over the years there have been times where I just deploy quickly and assume I will fix it later, but never do. This is one of those times.

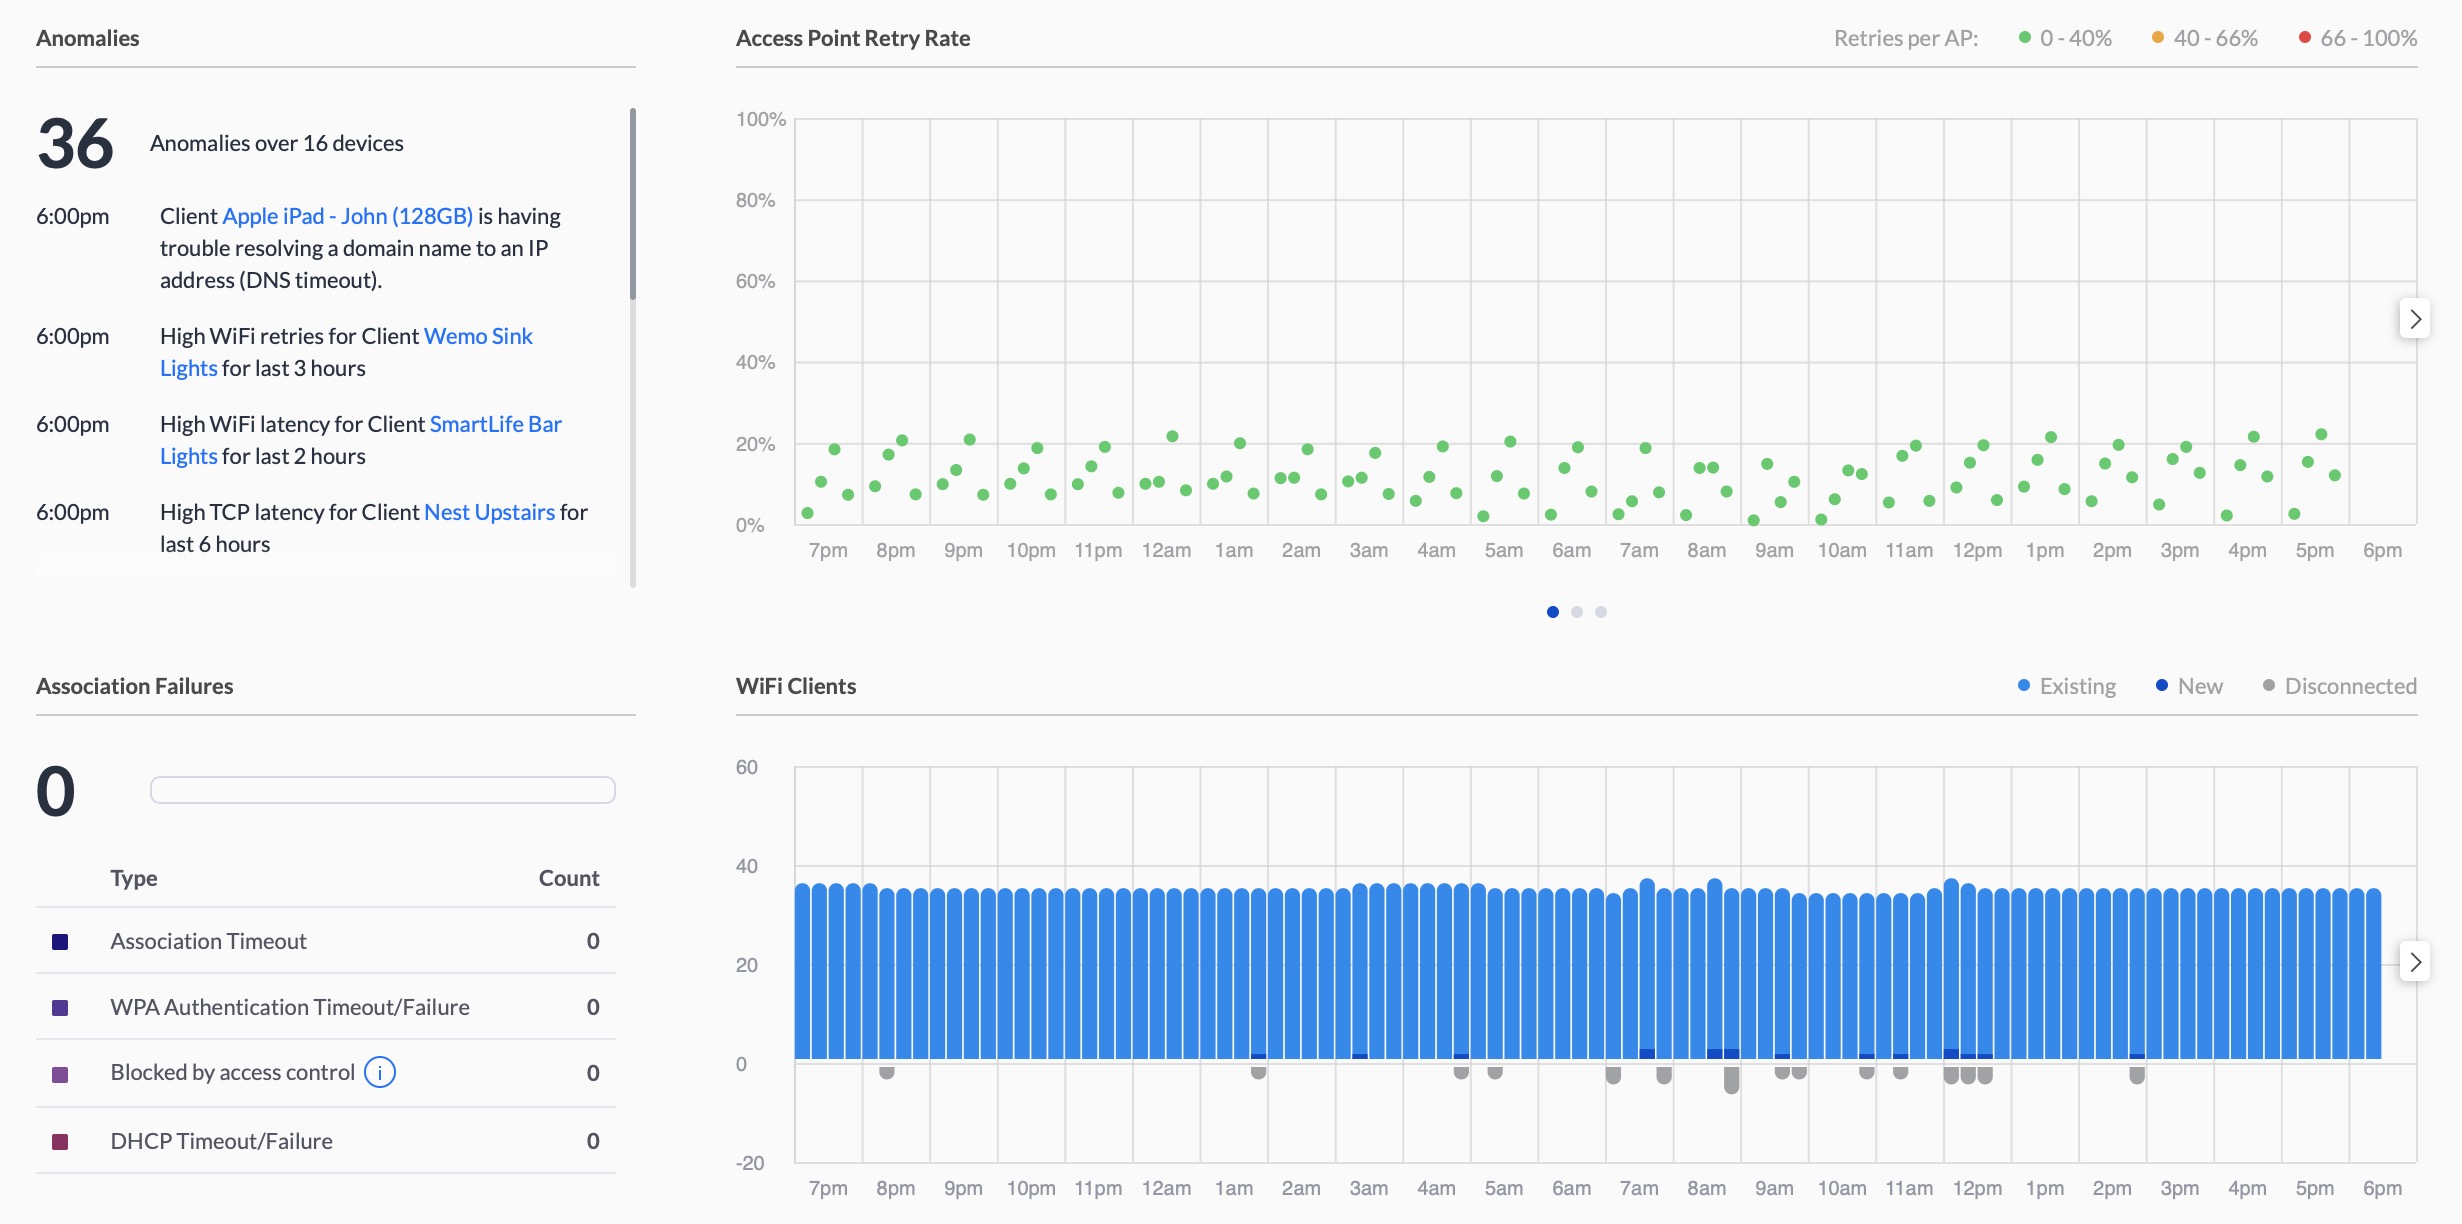
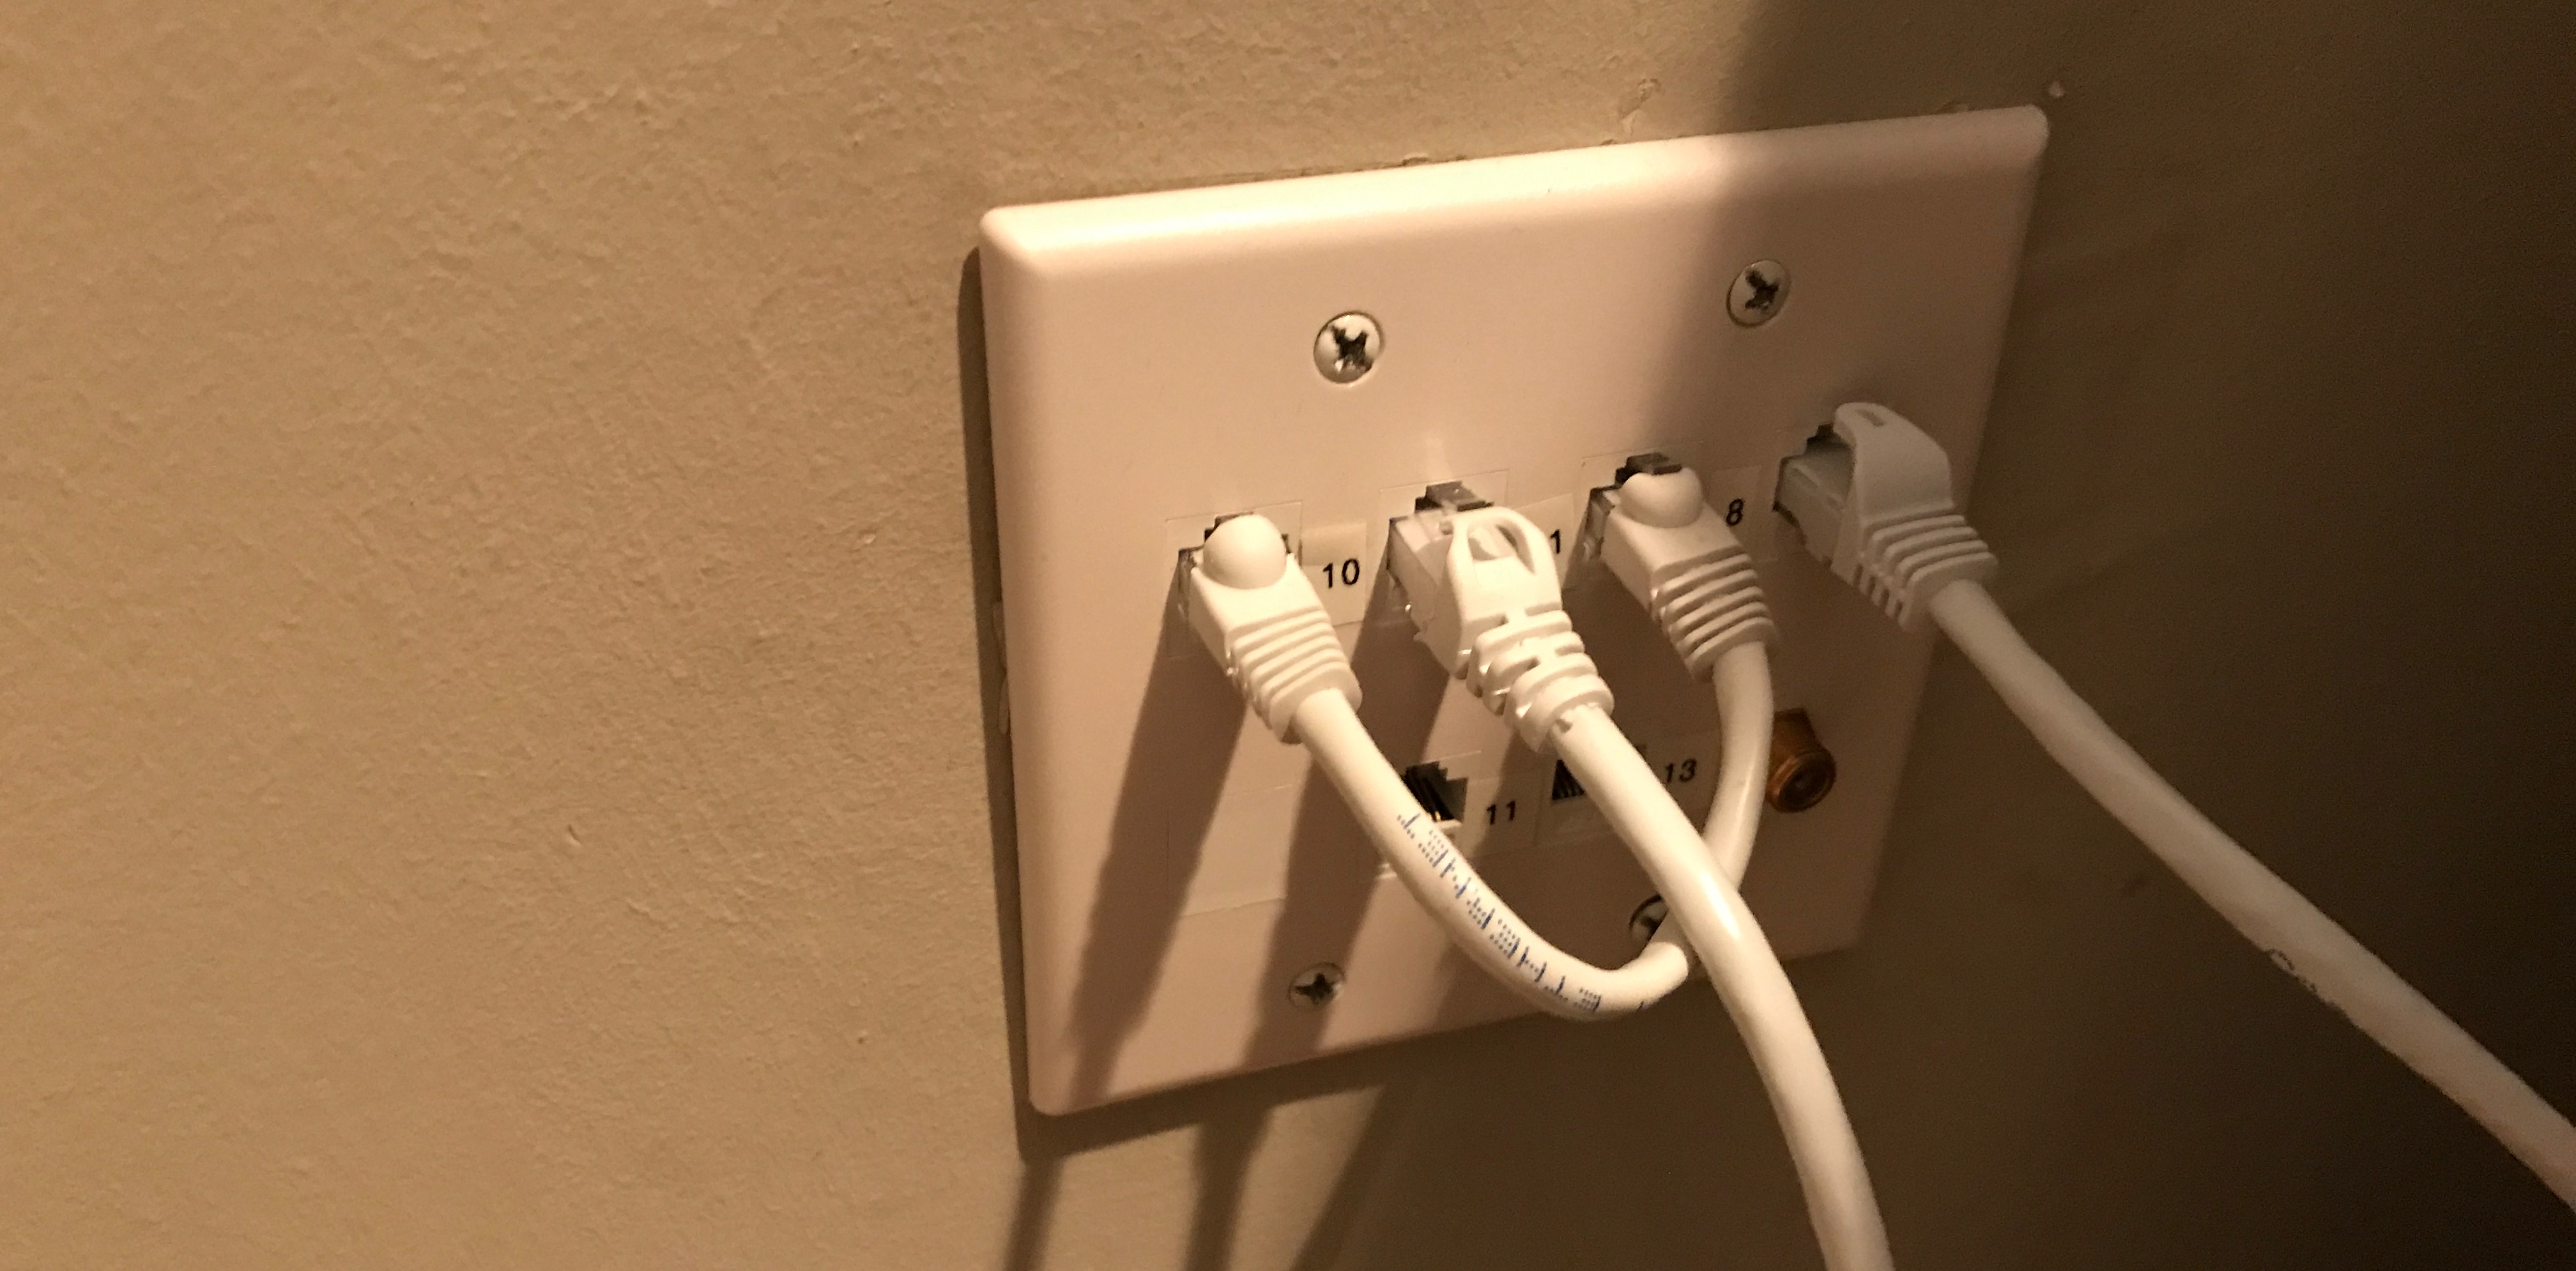
My house is 50 years old and the ship sailed a long time ago on cleanly installing network cables. A good portion of my cabling exists on the outside of the house. Luckily the external cabling is all outdoor rated and properly installed, but to get the Ethernet from one end of the house to the other required hopping from multiple switches. My dashboard every morning highlighted anywhere between 80 and 100 anomalies and between 8 and 10 network association errors. While this is not necessarily a deal breaker for performance, when other issues pop up, your gut tells you that some of this might be related.

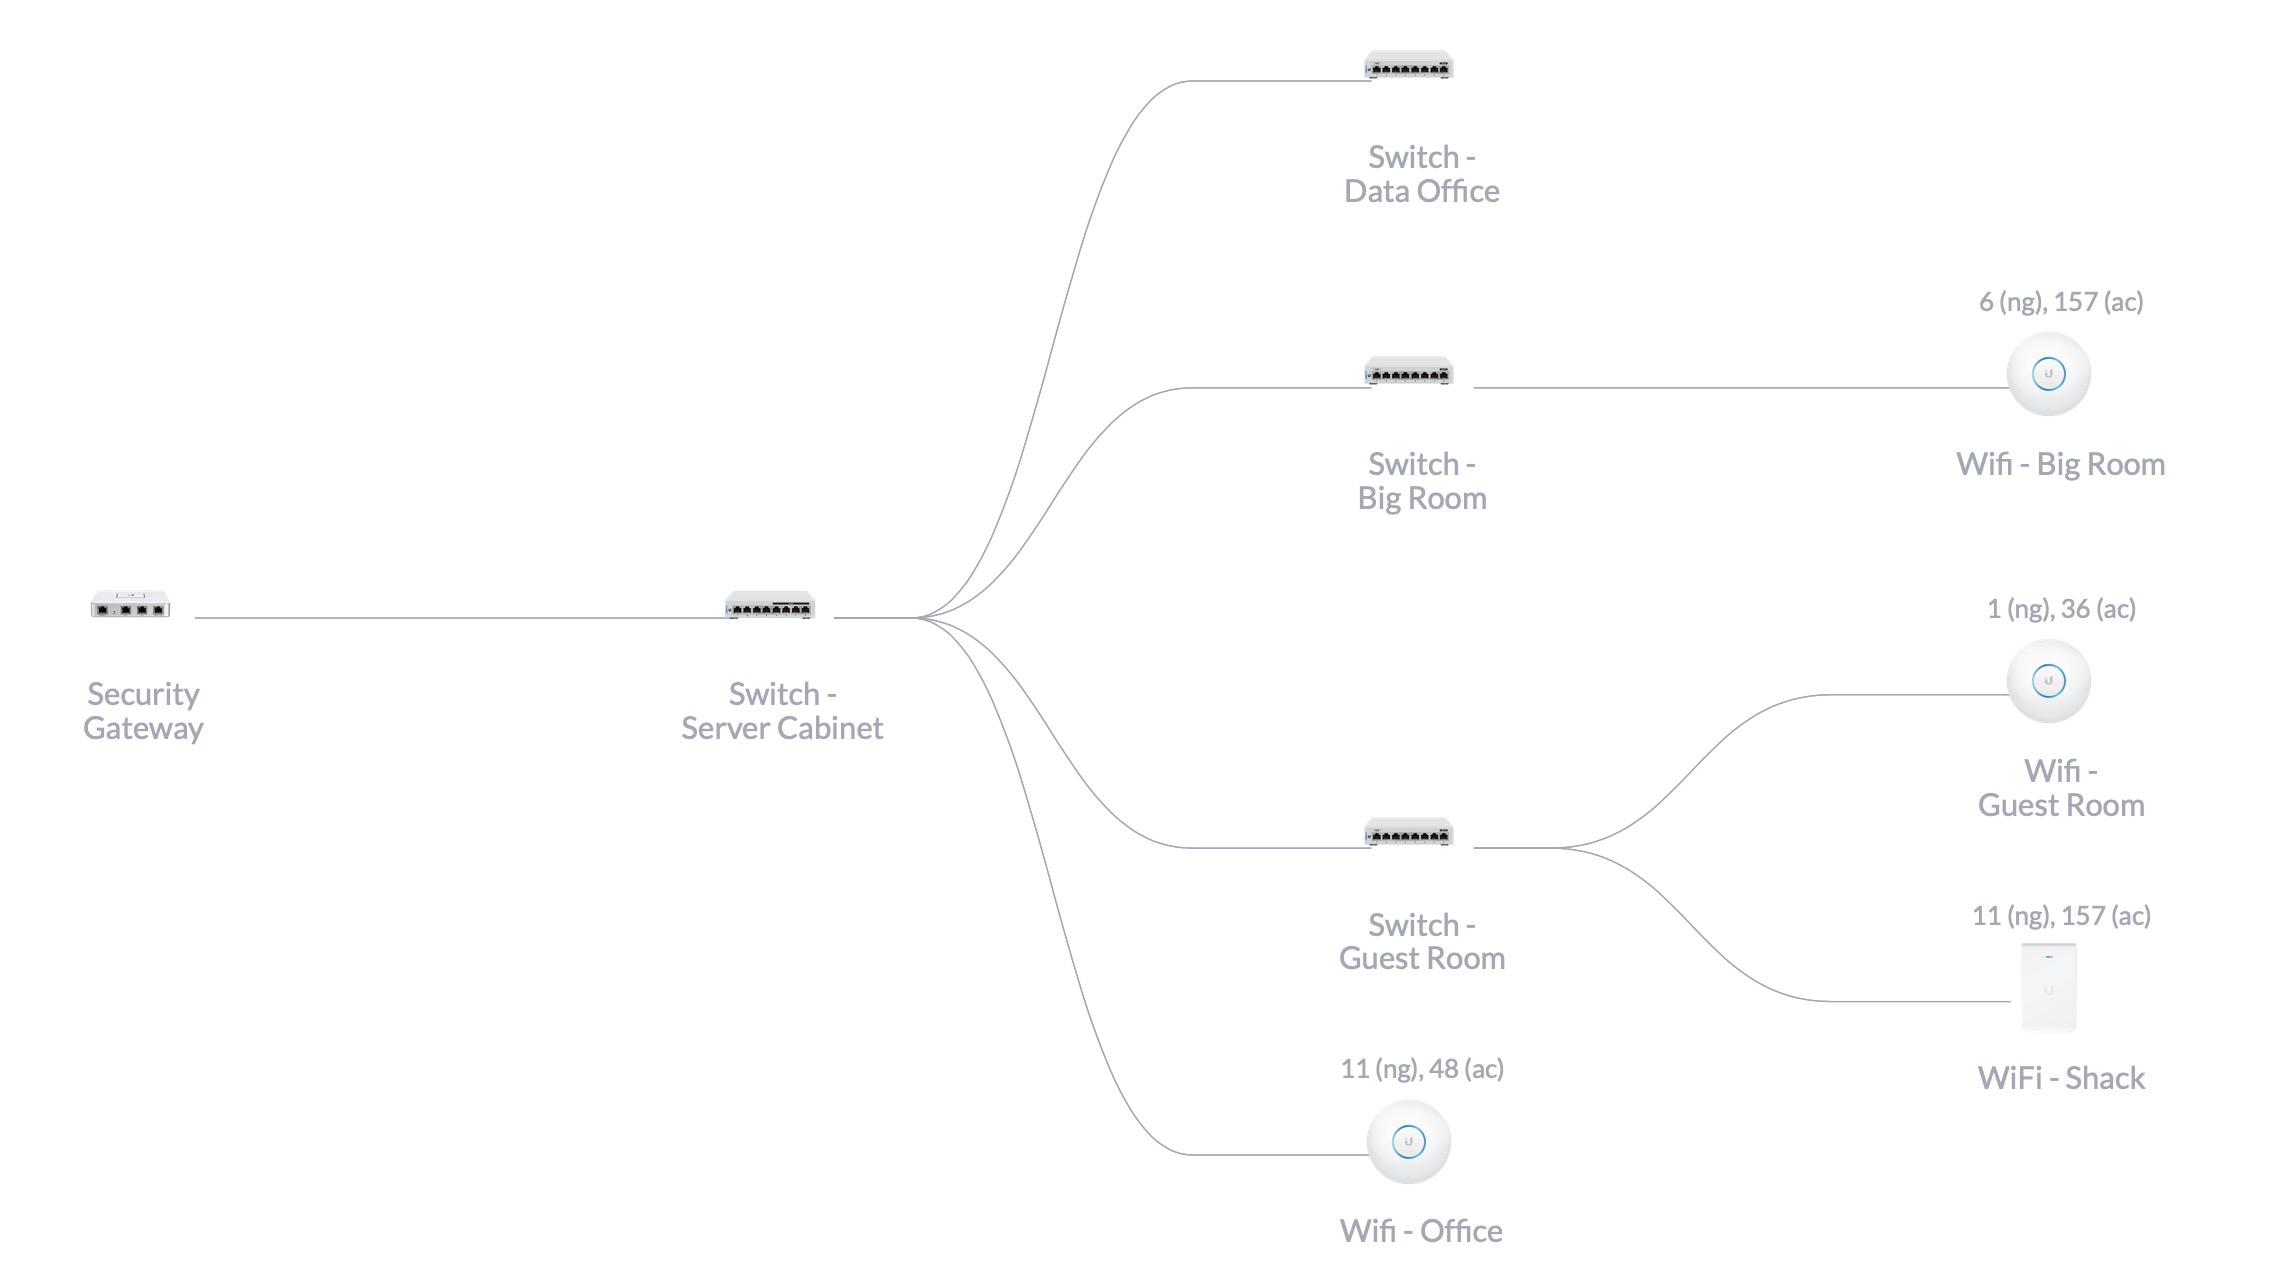
Here is a snapshot of what my network looked like:

The original mess

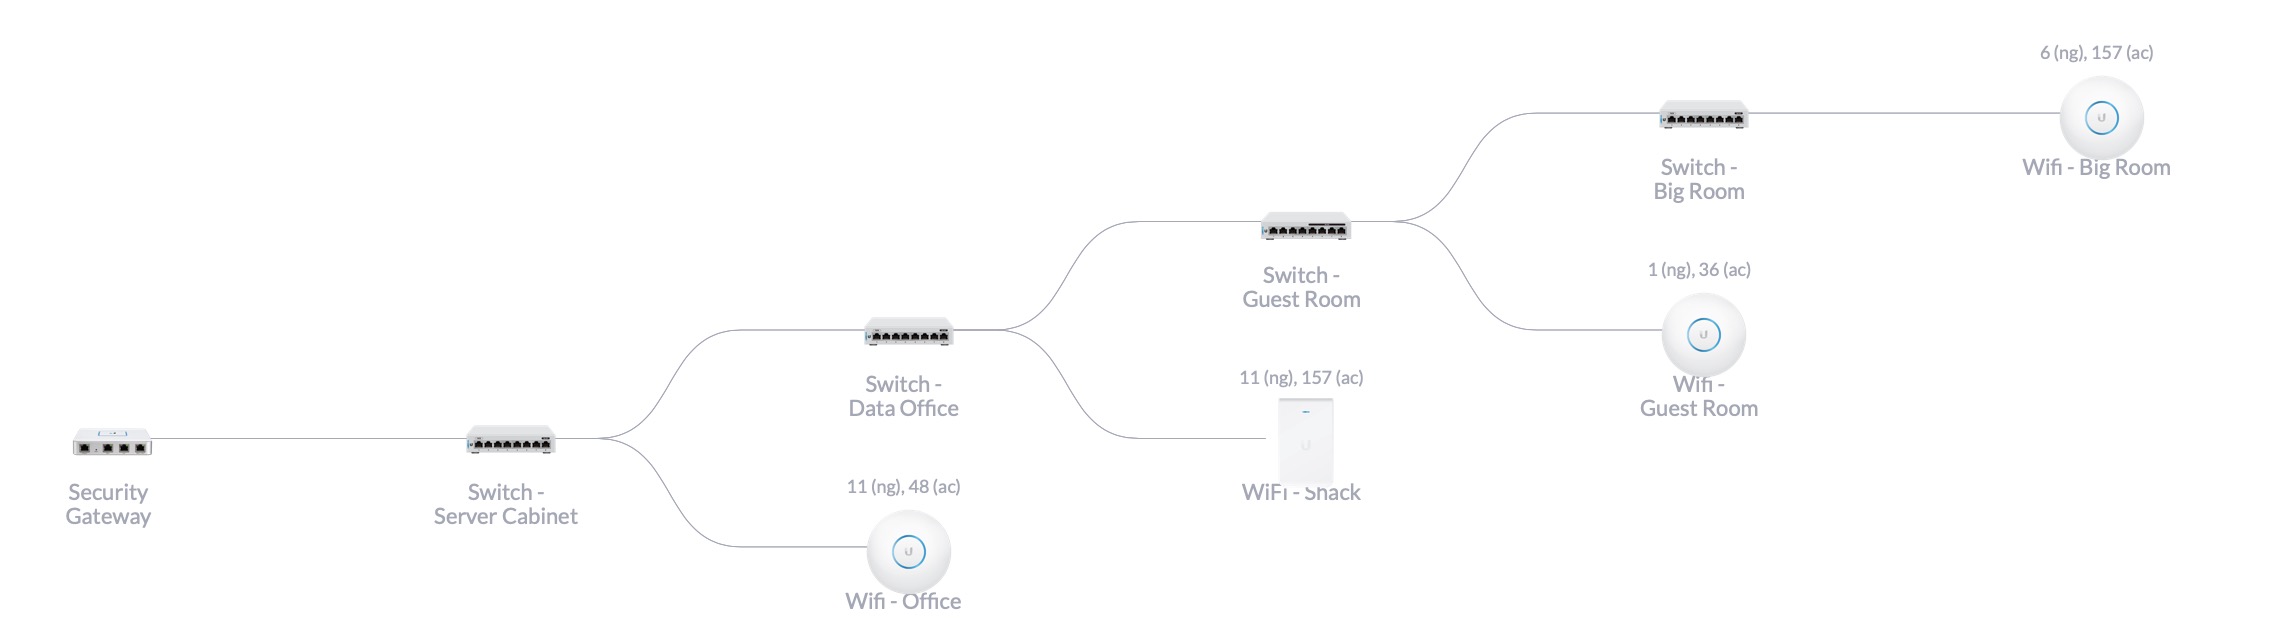
As you can see, it all *works*, but the cascading is not optimal. There are some VLANs that exist only between some particular ports, and the way this way configured required me to run all of the traffic up all of the trunks back to the primary switch, even though I was trying to keep the traffic off of particular switches.

By spending some time recabling and actually just using some patch cord jumpers to extend cables instead of just terminating them at the switch, I was able to extend the furthest out switch (the Big Room) all the way back to the office instead of making a pit stop at the guest bedroom.

Once the rewiring was completed, the last step was setting up the port configurations as almost everything changed. For the primary switch I also set the RSTP to 4096 and for all other switches, the RSTP was set to 32768. While it is a small network, a couple servers, 5 clients (mostly Wi-Fi) and 4 switches, setting the RSTP up properly should help.

Here is a view of the new topology:

Once finished, there was a marked improvement from my perspective:

Pierogi Recipe

This is a recipe for pierogis, the Polish/Eastern European treat that is a staple with so many meals. I made a potato pierogi (the traditional version) but there are a ton of variations including mushroom, meat, and so many other choices

Pierogi wrapper ingredients:

  • 5 cups all-purpose flour
  • 1 teaspoon salt
  • 1 cup warm water
  • 3 eggs
  • 1/2 cup of softened butter

Filling ingreditents:

  • 4 medium peeled white potatoes
  • 2 medium chopped onions
  • 2 tablespoons butter (not softened like the wrappers, but at room temperature)
  • 5 ounces of softened cream cheese
  • 1/2 teaspoon salt
  • 1/2 teaspoon pepper
  • 6 cloves of garlic (or more, depending on your taste preferences)
  • 4 slices of bacon

Serving Ingredients:

  • 1 tablespoon butter
  • Sour cream
  • Parsley or paprika (if desired)


Make the Wrappers

  • Combine the flour and salt, if you have a food processor you can pulse this.
  • Add water, eggs and butter; mixing until dough forms a ball (pulsing in a food processor). You can add an additional 1 to 2 tablespoons of water or flour depending on whether you feel the dough is too thin or thick.
  • Let rest in the bowl, covered, for 30 minutes.

Make the Filling

  • Put the potatoes in a large saucepan, put in enough water to barely cover the tops.
  • Bring to a boil over high heat.
  • Reduce the heat, put a cover on the pot and simmer 10-15 minutes or until tender.
  • Sauté half the onions, over medium-high heat in butter until tender, put it in a bowl on the side, these are for eating.
  • Sauté other half of the onions, chopped bacon and all of the pressed garlic until tender, this will go in the filling
  • Drain potatoes. Let sit until steam has evaporated.
  • Mash potatoes
  • Mix in the cream cheese, salt, pepper into the mashed potatoes. Then add the onion/bacon/garlic mixture until thoroughly mixed.

Assemble

  • Divide your dough ball into four equal quarters.
  • On a lightly floured surface (countertop works great), roll one portion of dough to roughly 1/8” thickness.
  • Cut small round circles of dough. If you have a pastry/biscuit cutter, great. If you don’t, use a drinking glass.
  • Place a couple teaspoons of the filling mix into each circle
  • Moisten edges of the circle with water and then fold in half, pressing the edges to seal into a semi-circle. Amazon sells pierogi/dumpling makers and for a few bucks these are a great deal.
  • Repeat this step with each quarter of the dough ball until you are all out.

Boil

  • Bring a large pot of water to a boil over high heat; add the pierogis to the slowly rolling water in batches. I find that you can do this in conjunction with the assembly process, especially if you have 2 people.
  • Reduce heat to a simmer; cooking the pierogis for about 1-2 minutes. When they are finished, your pierogis will float to the top and they should be tender.
  • Remove with a slotted spoon or fork and place on a drying rack.

At this point pierogis can be stored in a cool fridge or frozen for later use (thawed and sautéed)

Sauté and brown (this step is if you are ready to eat now)

  • In a large skillet, sauté pierogis with onion in butter until the pierogis brown.
  • You can put parsley or paprika on your pierogis but at a minimum you should have some sour cream on them because the is the traditional way to eat them.

Freeze option (this step is if you want to savor these at a later date)

If you are not going to eat them right away, once they are dried on the rack, you can freeze them. I use sandwich-sized ziplock bags making sure to put about 12-14 per bag, depending on size. As long as they lay flat you are fine. If you want to use a single large holder, be sure to put wax paper between each layer so that they remain intact through the freezing and thawing process. All you have to do is repeat the sauté process once they are thawed.

Well, That Was Quick: Orbi Disappoints and Is Returned

I was pretty excited about the switch to Orbi: performance doubled and coverage was great. While it had an app, it also had a full web-based GUI for management and included a depth of configuration options. The fact that the web console was a bit clunky and hard to work with was fine because I could once again control my network from a laptop.

Then the updates started.

Continue reading

Amplifi vs. Orbi – It’s Time for a Change

I have been working with mesh systems for quite a while now and have some new observations. I had begun the journey with Google WiFi, a product that checked all of my boxes and had incredible performance, right out of the box. However, what I quickly realized with Google was that their business model and lack of flexibility really became the real issue and that led me down the path of unplugging it and replacing it with Amplifi.

Continue reading

Google Wi-Fi – It’s Missing Key Features

First, let me say that I have been using Google Wi-Fi for over two months now and it has virtually eliminated all of the Wi-Fi handoff problems and all of the dead zones in the house. Let’s get this out of the way early: it’s powerful, it is designed for easy setup and management. Compared to the other folks in the market, it is the price:performance leader by far. But it has some warts too. Big warts. I will continue to use it (for now), but I am not 100% bought in on the long-term strategy. Continue reading

Job Search Advice

I get asked on a regular basis to pass on resumes to my connections via LinkedIn or my customers. Sometimes it is very directed (i.e. can you give this to Bob at XYZ company) and sometimes it is very broad (i.e. get this to everyone). 

Before you give your resume to someone to distribute, please take a look at these simple rules. I have hired a few hundred people in my life. In order to hire 1 person, you have to interview 4-5. To interview 4-5 you have to phone screen 20. To phone screen 20, you have to read 200 resumes. I don’t claim to be an expert, but if you do the math, I think you can see where I am coming from. These are tips that have been collected over the years but they are as true today as they were back then and I will continue to add to this list. Continue reading